Sunday, November 13, 2011

M.I.A. for a reason

OK so I know I have failed miserably at blogging lately, but I have good reason, I promise! I have been busy doing stuff around the house. The most major undertaking involved some paint.....more like 3 gallons of it (!!) My mom helped me transform the first floor of our house from this:


To this:

Once I finally decided on a paint color, the rest was cake!

#2 (baguette by Sherwin Williams) was the winner by the way.

3 full days of work later, our lower level was no longer just one boring flat color.

I had read that in larger combined areas (kitchen, dining room, living room) you want to avoid too many different wall colors because it will interrupt the flow of the rooms. But I did decide to add a little punch of color on two of the kitchen walls that are pretty isolated from the other walls.


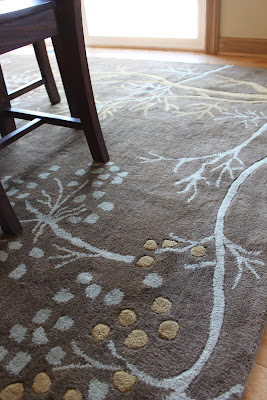
I pulled the greening/blueish/grayish (this paint is seriously like a chameleon....it changes colors all day) from our dining room rug and accent chair (again, going for the 'flowing' effect between the different 'rooms').


And just 2 weeks after I thought I could not pick up a paint brush or roller for at least a couple months, I did it! I just had to paint the last room on the first floor that mom and I did not get to a couple weeks ago (I guess the kitchen, living room, dining room and entryway was enough for one weekend.)

I went one step lighter on the paint chip for the living room/dining room to a color called Camelback (also Sherwin Williams). This took the half-bathroom from this:


To this.


I'm only about 99% done though, those little purple sticky notes are to mark spots that need touch up later this week :)

What a relief to have all the painting done! There have been several other small detail updates that I will post about soon. Have a great week!

Sunday, October 2, 2011

Latch Match

Remember this guy?
While the primary purpose of refinishing this cabinet was to add a pinch of uniqueness to the room, it was also important that it be functional.

Taking away from it's functionality was the fact that it took me over a minute to open the latch, secondary to the fact that the latch was who-knows-how-old and was either partially rusted shut or needed some serious WD-40.


I decided that I wasn't going to mess with it, especially if I could just order a brand new one for relatively cheap. It looked kinda gross too.

I searched and searched and searched for one that was the same size since I did not want to have to drill new holes. I quickly discovered that over the last several decades the standard size of a latch has changed. There were so many choices!

I finally stumbled across this one from a company called Spokane Hardware Supply.
It appear to match my current latch almost exactly!

I ordered it, and when it finally came to my door, I opened the box to find this:

Uhhhh, that's a dead bolt.....not a cabinet latch.

Sure enough, when I checked the invoice, my order got mixed up with someone from Montana.
When I called to inform the company, they were very nice about it. They arranged for a pick up of the door knob and a week later my cabinet latch arrived.

On the cabinet it went.....

and in went some of my less frequently used kitchen items!


Project: refinished antique cabinet = complete!!

Sunday, September 25, 2011

Autumn-ized

Well, judging by the feel of the air (and the calendar) I would say that Fall is here!! Kyle and I spent the weekend doing minor house things, including decorating the house for the coming months.

Starting with the outside.....

This wreath was the product of several wreaths on Pinterest that inspired me.


I picked up a few things at Hobby Lobby, and sort of made it up as I went along.


As you might have guessed, the most time-consuming part was wrapping the styrofoam ring tightly with yarn. Talk about monotonous!


After that part was finished, I just arranged the silk leaves, pumpkin, and "Happy Harvest" as I wished and had a hot date with my glue gun.


I'm not in love with it, but it will do for now.

Inside, I brought out some decor I had from years past.


And this year, since we're in a house and might have more than 2 trick-or-treaters, the candy bowl is oh so important!


While I was grocery shopping on Friday, this "little" guy just jumped in my cart.


As luck would have it, I happen to like Reese's....a lot :) Kyle has been asking where our Halloween candy is....he should know better....if we had it, it would be gone (especially with over a month to go before Halloween). So a pumpkin Reese's is what he gets for now.

Also from last year, I had some random leaves. I pulled them out of the tote and thought, what on earth can I do with these? For some reason, the idea popped into my head to make them look like they were falling in this thing:


I was instantly in love with the way the light from behind shines through.

So I affixed them them some sticky tack.

Next up we have another Pinterest inspired piece. If you don't do Pinterest, you probably have one more hour in your day than I do, as I am constantly browsing this website. These three "pins" first caught my eye.


They made me want to fill some sort of glass container with decor that can be changed with the season. And did you see that last picture? Those balls are made from thumb tacks!!

I had to try.


All I needed was some styrofoam balls and thumb tacks, which are a dime a dozen (well, actually a dollar for 300 at the dollar store). The tutorial online said to spray paint them when finished, but I like them gold for now.

Each ball took me 30-45 minutes (one ball completed per each episode of Ellen watched on the DVR). I arranged the balls with some (fake) pears and wicker balls from Pier One, and I was set!


I wouldn't put it past myself to "thumb tack" decorate something else in the near future...a wreath? A Christmas tree? The sky (or the Dollar Store thumb tack inventory) is the limit. It was fun and gave me something mindless to do while watching TV :)

Last but not least, I had some pine cones (and a random acorn) from years ago that I knew needed a face lift. I like the look of pine cones as decoration, but I didn't like the way these were painted.


Blah. I've been reading on blogs and Pinterest (shocker) about the power of spray paint, so I decided it was worth a shot.

First I primed them with a primer had from the office chair project in order to make sure that the spray paint took evenly to the surface.


Then I went to town with the spray paint (and in turn had to crack the windows in the house over night, causing our indoor temp to drop to 60 degrees last night....BRRRRR)


Wasn't crazy about them just hanging out on the mantel, so I found a tall vase at Micheal's and I spiraled a fun Fall garland around them inside the vase.


And congratulations if you made it through this entire post, it was a doozy. In fact, I barely made it through. Happy Fall!

Sunday, September 18, 2011

These Are a Few of My Favorite Things...

Pizza and tacos; such a wonderful combination. I've made taco pizza before, but for the first time I used actual bread dough (instead of a pre-made pizza crust). I found this bag of 3 whole wheat "loaves" in the freezer section.


All I had to do was thaw it in the fridge over night.


Next, I grabbed a pound of ground beef.


This grass fed variety our favorite kind. It's from a farm in Minnesota, but it's sold at the Super Targets here in Des Moines. It can be ordered online by clicking here!


While the beef was browning, I chopped up part of an onion....


....and added it to the ground beef, along with the taco seasoning and some water.

While letting the meat mixture simmer for a few minutes, I kneaded the dough into the best circle I could manage. This took some patience, as the dough kept wanting to shrink back into a ball instead of lay flat.


As a spur of the moment decision, I decided to add some refried beans to the pizza since I already had a can.

But only to may half, because Kyle doesn't like refried beans, or so he says :)


Next I sprinked the meat mixture over top.


And last but not least, the cheese! I used reduced fat shredded mexican cheese.


Then I popped it in the oven at 375 degrees for about 20ish minutes.


Meanwhile, I prepped some toppings.


We topped off our slices with some crumbles of Baked Doritos.

This dish will definitely make a re-occurance in our kitchen soon!